Посадка суккулентов: Посадка суккулента в горшок, пересадка, какую почву использовать
Succulents in gravel culture (Photo) at home – planting and care – Flowers at home
Succulents at home
Greetings to indoor plant lovers.
I want to share my experience in growing cacti and succulents in a mineral substrate on a windowsill.
For a couple of years I was «having fun» with soil mixtures, experimented with their composition, studied articles and thematic forums.
I was looking for “sacred” places with mole mounds in the vicinity, harvested land with the desired pH through deciduous groves and coniferous windbreaks…
And how many different additives in the form of perlite / vermiculite and sand from a quarry near the river — do not count. But the proportions of all these ingredients are also important.! They need to be selected and preferably individually for each type of plant..
And then one day I decided — that’s enough! There must be alternative ways to grow succulents and cacti.. And I found them.
IN SEARCH FOR SUBSTRATE REPLACEMENT
The first mention of mineral substrates, which I came across on the Internet, — beautiful cactus collection, contained for decades exclusively in brick chips, without adding other components, including land. This example inspired me to further search for options and watch numerous videos on a similar topic..
Succulents at home
FIRST EXPERIMENT
Finally, I made up my mind and transplanted a small withering Haworthia cooperi into regular gravel with a fraction 4-8 mm.
The transplant took place in the middle of winter, and whole 2 for a month I patiently walked in circles around my «charm» and monitored her condition. By the end of the second month of observing the poor fellow, sitting in bare stones, I was surprised to understand, that Haworthia is not going to «die».
On the contrary, she pouted, has grown an ideal rosette and, looks like, enjoyed life with might and main. By the way, for these 2 months two other Haworthia and one Gasteria, which were much stronger in appearance, safely departed to another world from the earth substrate.
How do I transplant cacti into gravel
Watch this video on YouTube
GOOD LUCK
When my patience has run out (languish in ignorance for whole 2 months!), I decided to look, what roots did my subject grow in the gravel. An attempt to shake the haworthia out of the pot was only partially successful — only gravel spilled out, and that’s not all, about a third of him was firmly and tenderly swaddled by wonderful fat, snow-white roots! My joy was endless. This is how I became an adherent of supporters mineral substrates.
FARTHER – MORE
Within a month, I transplanted all the bitches into gravel. Since at that time there were not many of them and they could not boast of large sizes, I purchased a ready-made substrate, although it is quite expensive — Lechuza PON (PON owl), zeolite mixture, pumice, lava with the addition of fertilizers, etc..
First season, spent by plants in lechuz, was beautiful — they grew, tolsteli, bush. The only thing, did not bloom, but this did not bother me — I made a discount for the adaptation period, plus it’s a little sunny summer.
LIFE MAKES CORRECTIVES
Autumn came, and the collection moved from the sub-windows of the south-west direction of the sub-lamp. After a month of «sublamp» life, I noticed, that the plants are «sad». It turned out, large amount of light and temperature +25 city, contributed to the rapid drying of the mineral substrate, and regular watering every 10 days for plants began to miss. Transplanted into plastic pots (before that grew up in ceramics).
Another nuance: different plant species have different roots. Powerful — at the Haworthies, gaster, aloe and agave, loofah-like, thin — in various crassulas. After pondering the situation and reading various sources on the Internet, I sifted the whole thing through a sieve with holes Zmm. Happened 2 factions: one is smaller (2-3 mm), for species with fine fibrous roots, the second one is larger (4-8 mm) for succulents with a strong root system.
After this adjustment, my plants are doing well again., some even bloomed. However, this is not the end of the story.…
so, I stopped my story on that, that the plants in the mineral substrate have adapted, some even started to bloom. Then I would have to interrupt the experiments, but, as they say, life does not stand still — there is a need for another transplant.
Many succulents have outgrown their pots during a year of life in a mineral substrate and began to require more volume., what, naturally, also implies a significant consumption of the substrate, and «Lechuza PON» is not a cheap option at all. When you have, eg, 10 plants — can be grown in lechuza, and if a few hundred? Naturally, I wanted to dilute the mineral substrate with something less expensive, but the physical properties are not inferior to the main components of lechuza — pumice, lava and zeolite. These ingredients are porous, with neutral acidity, hold moisture well and give it to the plant gradually. Plus they are light, no sharp edges and breathable — the risk of flooding is minimal. Of the available components, claiming to be an additive to my substrate, after a long search and samples, two remained — diatomite and zeolite.
FINAL CHOICE
Diatomite is sold in the garden departments of shops under the name «Krem-Nevit» and costs almost like «Lechuza PON».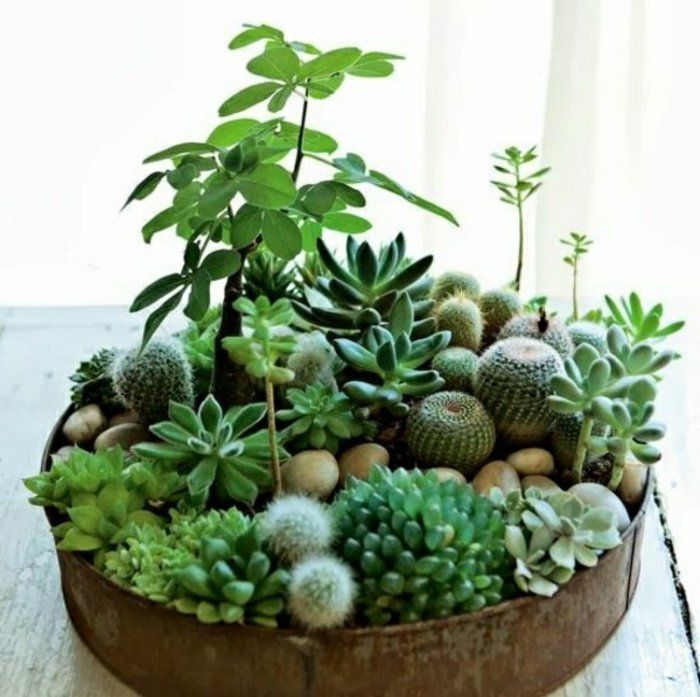
At the same time, in the departments with pet supplies, it is also offered as a filler for cat litter., eg, Pussy Cat mineral (fine fraction 2-3 mm), and «BIO Comfort» super absorbent (larger fraction 4-6 mm). Such zoological components for the substrate are much more budgetary..
Zeolite already exists in Lechuza, and experienced cactus growers do not advise adding it to the mixture anymore 30%, and better 15%. This is due to the property of zeolite to initially absorb harmful substances., which is great. But after a while, it begins to release everything absorbed back, which is not good at all.
So I opted for diatomite, and for the second year my plants live in a mixture of it with lechuza 1 x1 and feel great. Little of, periodically arrange sowing: I sow in a fine fraction of such a mineral substrate, and the seeds of various types of succulents sprout wonderfully, and the seedlings are pleasing with the growth rate.
FEEDINGS ARE IMPORTANT
Obviously, that plants in gravel culture should receive nutrients regularly and in sufficient quantities.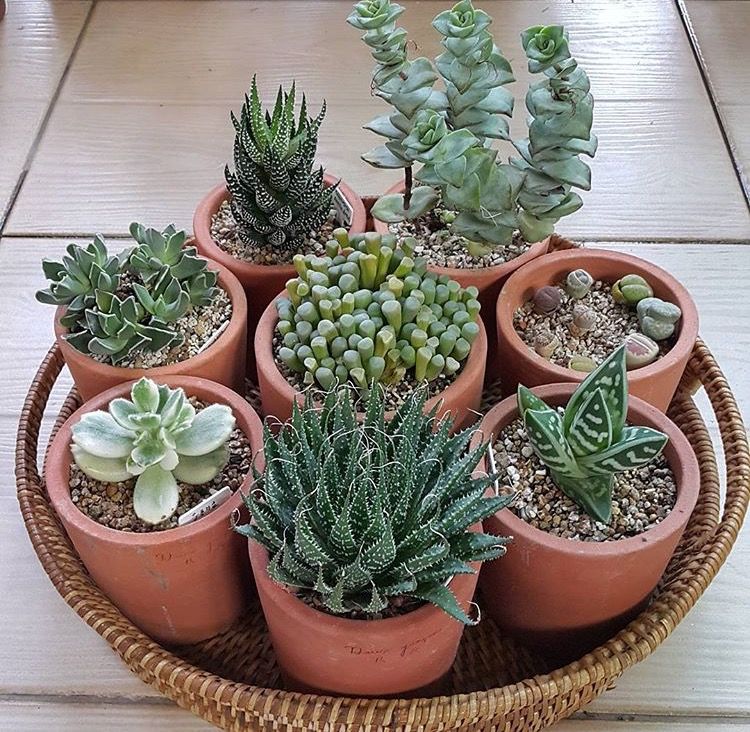 Therefore, every third or fourth watering I add fertilizers to the water. I use any specialized drugs available, necessarily with microelements in chelated form, I dilute them in half the dose of the value indicated in the instructions. In my conditions, Bona FORTE. For cacti and succulents «, «Good Power. For cacti and succulents «and» Florovit. For bonsai «. Those instances, who spend the winter under the lamps, I feed the same, as in the summer on the windows, — every third watering.
IRRIGATION FEATURES
The water is good in my area (from an artesian well), therefore, it is not necessary to defend and boil it. So I water it warm (+25-30 city.) tap water. I do bottom watering once a month or two, leaving the pots completely in water for half an hour, at the same time give the plants a warm shower, they love this business. After such water procedures, I leave it to dry slightly, do not directly expose to sunlight to avoid burns. At all, for the entire time of using the mineral substrate and wintering under the lamps, none of my plants got burned after leaving the «underground» on the windows with the burning spring sun. So I don’t shade them unnecessarily.
Hopefully, some of the readers will be inspired by my notes, and there will be more supporters of mineral substrates. Share your experience too!
© Author: Anna GASHNIKOVA, r. Minsk. Photo by the author
CULTIVATION OF SUCCULENTS IN HOME CONDITIONS – LANDING AND CARE. TIPS AND SECRETS OF GARDENERS
SUCCULENTS «LIVE» PAINTINGS
Succulents at home
Succulents got into my collection from friends «under pressure»: or pick up, or throw away.
LET LIVE
Divided the bushes and transplanted into fresh soil. Since it was warm, put it in the yard under a grape bush on a table. A little later I moved him closer to the sun, but direct rays fell on the adopters only periodically. Over time, most of them formed rosettes, acquired symmetrical outlines — handsome. When I read about them, it turned out, my tenants are not so picky. Love the sun, moderate watering, perfectly tolerate dry air, what is important in our southern climate, and containers with soil suitable for them modest in size.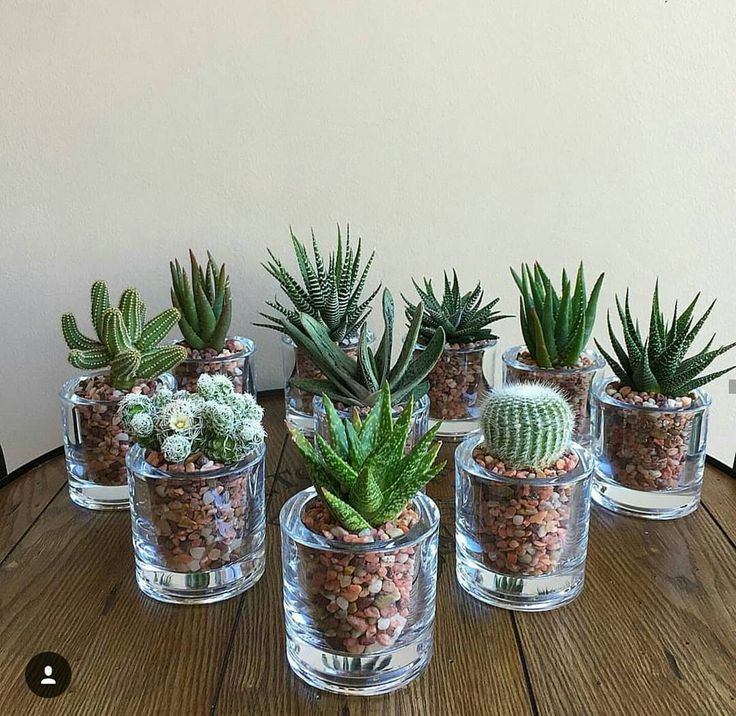
FOR COMPOSITION SUCCULENTA SUPER!
Later, when for a composition of indoor flowers I could not pick up flowering plants «beaten» by the July heat, pleasantly surprised by succulents. Everyone stood tight, beautiful, and the colors: from intense green to smoky silver. Srono added cacti to her scarce collection of thorns on the market at that time, stonecrops, peasants. Found suitable bowls, vases, boxes and began to create flower arrangements. I added various elements as decor: animal made of plastic, miniature flowerpot,artificial insect, etc.. The soil is sprinkled with fine gravel or white marble chips. The result exceeded expectations — in fact, she created «living» pictures out of nothing!
© Author: Elena TIPS, Nikolaev region. Photo by the author
7 ERRORS IN CARE OF SUCCULENTS
POT «FOR GROWTH»
Succulents, unlike most houseplants, do not know how to resist various rot. The roots of plants are tender, suffer greatly from stagnant moisture. It is in a deep or wide container that the soil constantly remains moist.. This is why you need to use cramped, shallow dishes., in which the soil mixture dries quickly.
SUBSTRATE WITH PEAT
Nutrient peat is not suitable for growing succulents, rich in soil microflora. Main components in equal parts: forest or garden land from under a deciduous tree, mineral baking powder (coarse sand, perlite, vermiculite). But the requirements differ for different succulents.. for example, euphorbia prefer a denser substrate, and Haworthia — air, loose.
FIGHT AGAINST ROT
Mushroom rot develops slowly and appears, when it’s cool. You can still try to fight them with the help of fungicides. («Maxim», Vitaros, «Score» and others.). Bacterial rots develop quickly, destroying the plant in a couple of days. If you notice spots on your pet, mold, watery leaves, urgently cut off all healthy parts and root them again.
DISINFECTION
The ground under the trees is usually healthy (especially forest).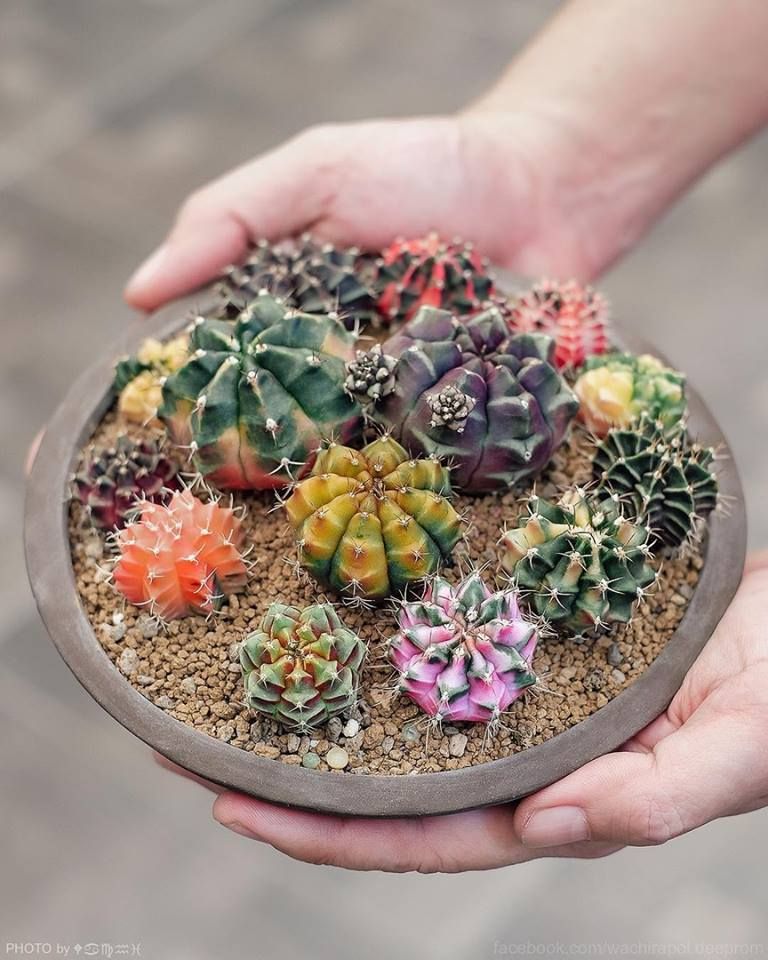 It does not need to be ignited or steamed. A big mistake is to spill the soil with a solution of potassium permanganate. This oxidant degrades its chemical properties., and also creates a crust on the surface of the soil.
TRANSFER
Purchased plant (healthy looking) must be transplanted from peat substrate. But not by transshipment, and carefully dismantling the earthen lump. If you damage small thin roots, nothing will happen. Protect the strongest. No need to wash or brush them.
BAD LIGHT
Away from the window, succulents can last a maximum of a month.. Moreover, the ground in this case should be practically dry.. Plants love good diffused lighting. In the dark they stretch out and die.
ROOTING IN WATER
Cuttings and leaves of succulents are rooted immediately in the substrate, after drying on the windowsill for 2-5 days. They rot in the water.
© Author: Dmitry Ulochkin, florist-biochemist, r.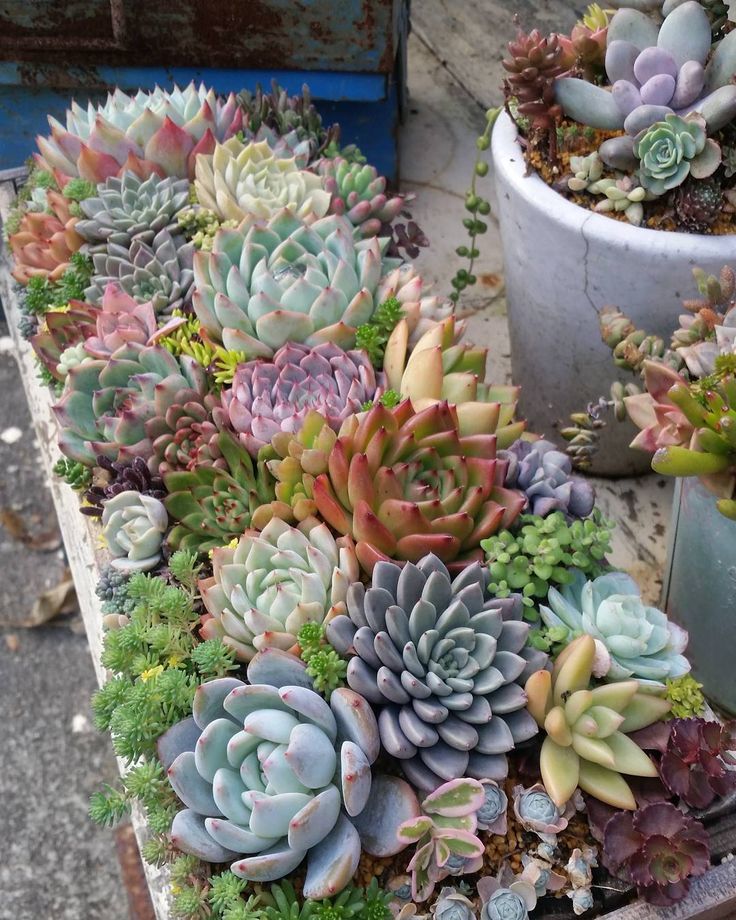 Ryazan
WE KEEP THE COLORING OF SUCCULENTS UNTIL SPRING
Succulents – care
Succulents at home do not have enough ultraviolet spectrum in winter, which affects the intensity of the pigment. And if the plant has a natural green color, then in low light it will slightly «fade». To maintain interesting colors, eg, echeveria, sedum, graptopetalum, necessary, so that they stay on a sunny cool windowsill or veranda for as long as possible, in the loggia, where there is enough light and fresh air, and night temperature differs significantly from daytime, what is difficult to provide in an apartment. In addition, in the cold season, succulents rest., therefore I rarely water them at this time, only slightly wetting the soil.
After all, the root system is not able to assimilate the same amount of water., and excess moisture in low light contributes to the «greening» of wonderful specimens with purple, yellow-orange, red colors.
All plants, sure, will survive the winter, but if the necessary conditions are not met (moderate watering, cool(+10-15 city. ) content, sunny location, soil suitable for succulents) lose their bright color.
© Author: Elena TIPS, Nikolaev region. Photo by the author
COMPOSITIONS FROM SUCCULENTS
Succulents are some of the most unpretentious indoor plants.. Small compositions created from them look just great.. Small footprint, but at the same time original and low maintenance, they will live well on the desktop, and at home, and can even be a great gift.
BASIC PRINCIPLES
Having several succulent plants at your disposal (cactus, fat women, criticisms, etc.), you can create a variety of compositions, considering the following points.
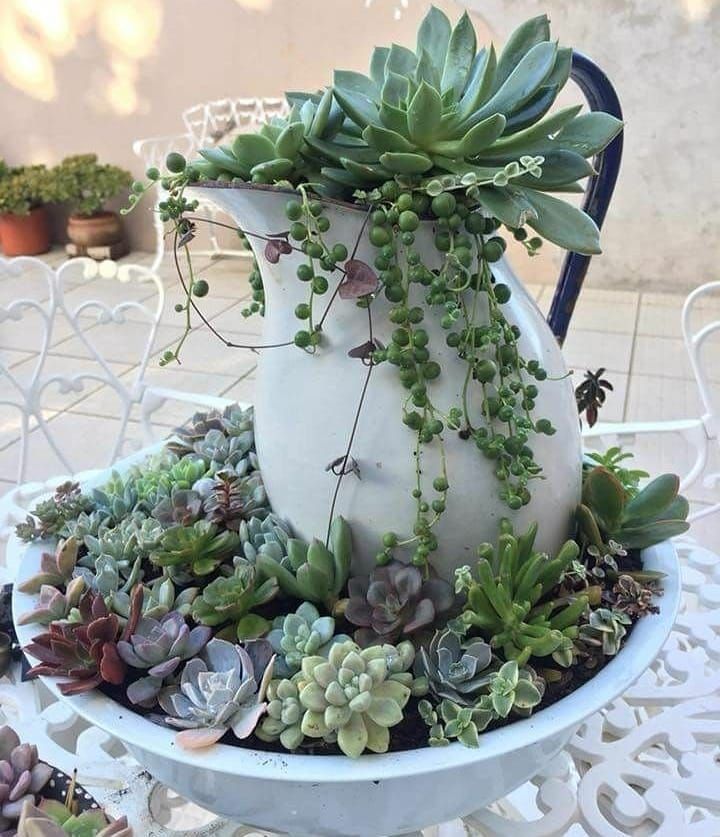
Composition container. Bowls are best suited for these purposes.: plants in them are located freely and have a place for growth. Bowls can be like plastic, and ceramic. Plants can also be planted in a beautiful plate, and into a wide opaque plafond from the lamp. the main thing, so that there are drainage holes in the dishes used. If the holes are not provided for the structure of the container, then in this case the bowl needs at least 1/3, fill with drainage and water very carefully accordingly.
The shape of the container can be very different.: round, square, oval or rectangular. It is desirable to select a neutral color.: Brown, gray or white. In principle, it should be a plain surface., t. to. a bright pattern will distract attention from the composition itself. The height of the pan must be 1 /3 from the height of the composition.
Drainage. Expanded clay or fine gravel is almost always used as drainage and much less often – Styrofoam. Expanded clay is usually purchased in specialized stores., so it can be used without prior preparation. But the gravel needs to be washed several times in running water and then boiled for 15-20 minutes.
Priming. It is best to use a ready-made succulent substrate. Although you can compose it yourself.
Decorative sending. It gives completeness to any finished composition.. You can also use multi-colored glass stones here., and gravel. Gravel, as for drainage, before use, be sure to rinse and boil. It is better to start laying pebbles with a «slide» from the middle of the composition to its edges. .
.
SELECTION OF PLANTS
So that the composition is not «one-day», and for many months and years pleased its owner, selection of «astronaut candidates» must be done carefully.
- It is unacceptable to plant plants together, requiring different lighting conditions, watering and winter maintenance. Besides, the neighborhood of plants from different continents will not be entirely correct – cacti from America and other types of succulents from South Africa.
- Several species of the same genus are perfectly combined in one composition., eg, lithops, varieties of crassula (fat women) or sedums.
- Slow growing succulents are best suited for composition., t. to. in this case, their frequent transplanting and pruning is not needed, or their dwarf forms.
- Layer composition. Dominant element: обычно это древовидное растение на заднем плане, it is on him that the main emphasis is placed. It could be aeonium, sansevier, stapelia, euphorbia, treelike crassula or columnar cactus.
For your information. The height of this plant should be approximately 2/3 the height of the entire composition.
Middle tier: this includes lower than the dominant plant element. Desirable, so that they are spreading plants, bushy. Most often, slow-growing echeveria is used in such compositions., havor-tii, gasterii, pachyphytums, guernyi, piarantuses, senezio et al.
Lower tier (ground cover plants) : monantes, sedums, creeping crassula, etc..
- Picking up plants, consider, that although they will differ from each other in their shape and color, but at the same time they must create the impression of harmony. Remember. In a medium sized composition (bowl with diameter 15 cm) can coexist up to 5-7 plants. More of them creates congestion and the composition turns into something unintelligible..
- Compositions are considered especially expressive., in which plants are selected with a contrasting color of leaves and their mutual arrangement (the next, the opposite), as well as imitating natural micro-landscape (eg, desert).

COMPOSITION CARE
Composition care process, consisting of succulents, includes the following points:
- Watering. It is carried out using a syringe, directing a stream of water to larger stones. Sometimes in the summer you can spray from a spray bottle.
- Removal of unwanted plant growth.
- Pruning creeping and ground cover species.
- Removing dried leaves.
- Removing some of the stones, interfering with the growth of plants.
You can also use a piece of shell rock to create a composition of succulents.. To do this, they make small (3-4 cm deep) holes, that fill with earth. Succulents are planted in them one or several at a time.. Watering such a rock carefully, each landing separately, trying not to erode the soil. The pallet is selected according to the size of the stone.
КОМПОЗИЦИЯ С СУККУЛЕНТАМИ СВОИМИ РУКАМИ | СДЕЛАЙ САМ
Watch this video on YouTube
Succulents let’s see what they are
Watch this video on YouTube
Суккуленты в банке — как правильно их употреблять
Растения в банке — пошаговое руководство
Все стеклянные сосуды, от подвесного стеклянного шара до террариума, подходят для посадки суккулентов.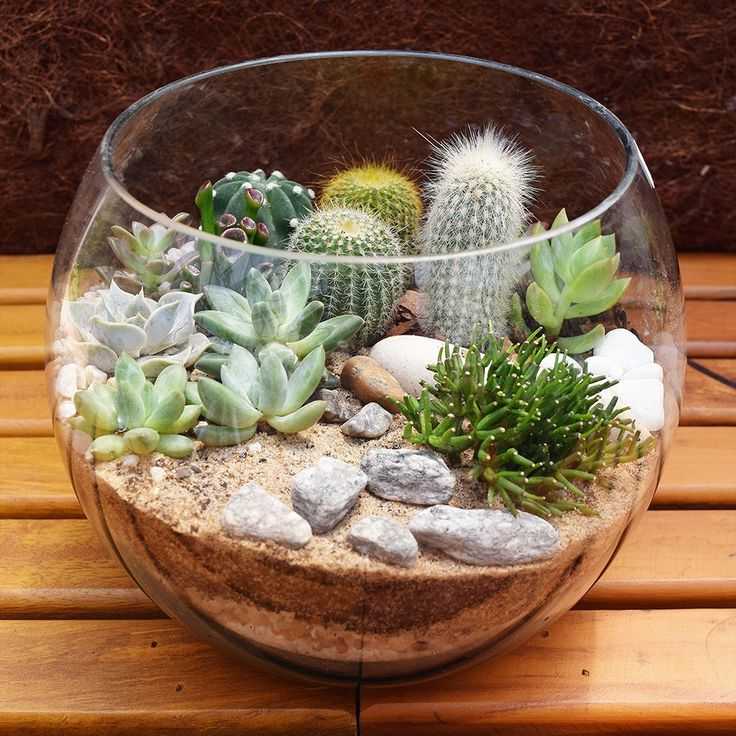 У вас также есть: керамзит (17,50 евро на Amazon *) для дренажа, сочная или кактусовая почва в качестве субстрата, галька или кварцевый песок (14,90 евро на Amazon *) для украшения. Противоскользящие перчатки для работы с вооруженными растениями. Разумеется, в качестве главных героев не должны отсутствовать различные суккуленты. Вот так правильно работает посадка в стакане:
- Разложите на полу керамзитовые шарики высотой 1-2 см в качестве дренажа.
- Насыпьте сочный грунт и смочите мягкой водой.
- Выкопайте небольшие посадочные ямы ложкой или колой
- Горшки для каждого растения и растения в дупле.
- Придавите субстрат ложкой для хорошего контакта с почвой
также читайте
- Правильно сажать и ухаживать за суккулентами на балконе — вот как это работает
- Посадка суккулентов в саду — как правильно делать?
- Сажайте суккуленты в горшках и ухаживайте за ними — вот как это работает
Наконец, вы можете украсить суккуленты в бокале, как вам нравится. С помощью гальки или кварцевого песка вы можете создать в миниатюре реалистичную среду обитания. В то же время тонкий слой неорганического материала предохраняет листья сочных розеток от прямого контакта с влажной почвой и, следовательно, от гниения. В соответствии с нынешним сезоном, добавьте весной небольшие пасхальные яйца или добавьте рождественского шика суккулентам зимой с помощью мишуры.
Как правильно ухаживать за суккулентами в банке — советы и хитрости
За суккулентами так же легко ухаживать в стекле, как за их сородичами на подоконнике или в саду. Это не значит, что экзотические декоративные растения могут полностью обходиться без вашего внимания. Как правильно ухаживать за причудливыми украшениями:
- Первый раз поливать мягкой водой через неделю после посадки.
- С марта по октябрь всегда поливайте субстрат, когда он ощутимо высохнет.
- Применяйте жидкие сочные удобрения каждые 3-4 недели с мая по сентябрь.
Суккуленты любят проводить зимнюю передышку в стекле в ярком прохладном месте с температурой около 15 градусов по Цельсию.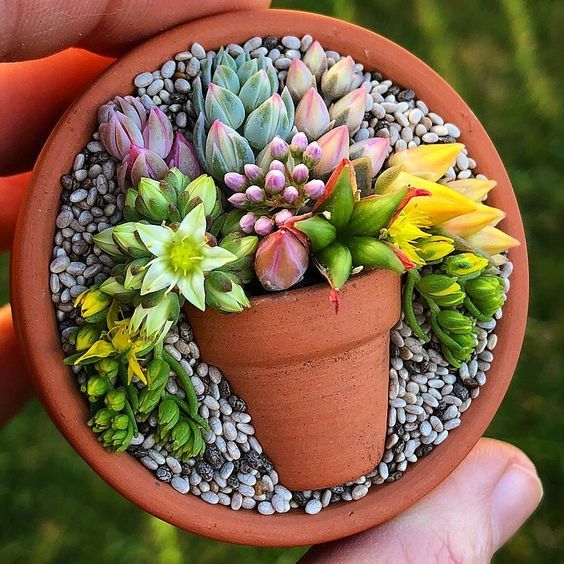 Из-за меньшего испарения полив нужен очень редко или совсем не нужен. Регулярные пальцевые тесты показывают, нужна ли вода. Почва не должна полностью пересыхать. Зимой суккуленты не получают удобрений.
подсказки
Суккуленты в стакане любят проводить теплое время года на солнечном балконе. Если растения здесь имеют возможность наслаждаться свежим воздухом и прямыми лучами солнца, они дают долгожданные цветы чаще, чем при круглогодичном комнатном выращивании. В идеале выбранный стеклянный сосуд должен быть защищен от дождя и открыт с одной или двух сторон для хорошей циркуляции воздуха.
Как сажать суккуленты в горшки без дренажных отверстий
В этом посте рассказывается о том, как сажать суккуленты в горшки без дренажных отверстий. Если вам интересно, нужен ли суккулентам дренаж? Ответ положительный, но это не значит, что их нельзя сажать в горшки без дренажных отверстий. Вот как их сажать и поливать.
Как сажать суккуленты в горшки без дренажных отверстий В своем посте об уходе за суккулентами в помещении я изложил один ключевой совет по уходу за суккулентами: дренаж имеет решающее значение для поддержания здоровья суккулентов. Суккуленты боятся переувлажнения — это может привести к гниению или заражению вредителями. Фу.
Так почему же я пишу пост о том, как сажать суккуленты в горшки без дренажных отверстий? Ну, потому что ты спросил. Вы меня конкретно не спрашивали. Но пока я проводил исследование для другого поста, я заметил, что у многих людей есть этот вопрос. И путаница неудивительна — в руководствах по уходу за суккулентами говорится, что горшки с хорошим дренажем — лучший выбор.
Но во многих горшках нет дренажных отверстий. Особенно вещи, которые вы переделываете в кашпо или очень милые крошечные горшки, которые идеально подходят для суккулентных малышей! Итак, давайте поговорим о посадке суккулентов в горшки без отверстий.
Хотите больше советов по уходу за растениями? Вам также понравятся мои руководства о том, как ухаживать за змеиными растениями, как ухаживать за растениями потоса, как ухаживать за фикусами, как ухаживать за растениями пеперомии и как ухаживать за филодендронами.
Просто выложу и скажу спорную вещь: суккулентным горшкам дренаж не нужен. Конечно, в идеальном мире все наши горшки были бы красивыми и имели бы скрытые дренажные отверстия, чтобы мы никогда не переливали наши растения. Но, особенно если вам нравится делать горшки своими руками из переработанных вещей, дренажные отверстия не всегда могут быть вариантом.
Но не бойся! Есть решение. Вы заметите выше, что я сказал, что дренажные отверстия помогают гарантировать, что мы никогда не перельем наши растения. Итак, если вы хотите посадить суккулент в горшок без дренажных отверстий, лучше всего… избегать чрезмерного полива!
Как сажать суккуленты в горшки без отверстий Мне нравится называть это «встраиванием» дренажа. Для этого я просто кладу на дно горшка слой гальки, камней или перлита. Мой выбор зависит от горшка — если это большой горшок, я могу использовать камни. Если это небольшой горшок, возможно, галька.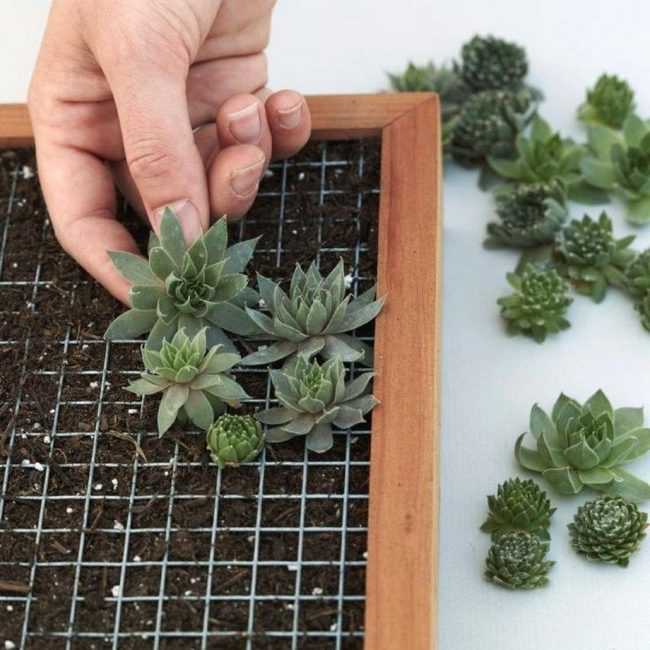 А если горшок висит, перлит — отличный выбор, потому что он очень легкий.
Я никогда не переливаю свои суккуленты. Однако, если я немного переусердствую с поливом, я знаю, что вода будет стекать во «встроенный» дренаж — перлит.
Размер слоя зависит от размера горшка. Если это очень большая кастрюля, я делаю более толстый слой. У меня не так много очень крупных суккулентов (не считая моего змеиного растения). Вот пример горшка среднего размера. На дно я положил около 2 дюймов перлита.
Не забывайте всегда использовать хорошо дренированную почву, независимо от того, какой тип горшка вы выберете. Хорошо дренируемая почва для горшков может быть сделана из множества разных материалов, но вот быстрый и простой рецепт приготовления суккулентной почвы своими руками, в котором используются почва, перлит и песок.
Как поливать суккуленты без дренажа Я не эксперт. У меня просто миллион процветающих суккулентов в моей жизни. Так что берите из этого что хотите. Само собой разумеется, что если в горшке нет места для выхода лишней воды, вам не следует давать растению больше воды, чем ему нужно. Это может быть немного сложно, потому что, хотя верхняя часть почвы может быть сухой, нижняя часть почвы может быть нет. И в этом, наверное, корни… и эти корни не хотят сидеть в нужде.
К счастью, суккуленты являются засухоустойчивыми растениями и очень терпеливы к поливу. Они скорее предпочли бы недополив, чем перелив. Суккуленты хранят воду в своих листьях, поэтому листья становятся печальными, морщинистыми и немного сморщенными, когда растение испытывает жажду. Они перешли от использования воды в почве к использованию ее аварийного запаса. Фигово.
Чтобы поливать суккуленты в горшках без дренажа, я составляю график полива в зависимости от времени года. С конца марта/апреля по октябрь я даю своим комнатным суккулентам пить один раз в неделю. Я ошибаюсь на стороне подводного плавания. Но, честно говоря, я знаю, сколько сейчас нужно каждому растению. Вы просто почувствуете, сколько воды вам нужно давать им по мере их роста.
С ноября по начало марта я поливаю их умеренно — раз в несколько недель. В это время они не растут активно, поэтому моя цель — просто сохранить их до весны. Независимо от того, какое сейчас время года, вы должны убедиться, что верхние несколько дюймов почвы высохли, прежде чем снова поливать.
Если это горшок меньшего размера, вам, скорее всего, будет намного легче определить, пересыхает ли растение. (Вы когда-нибудь замечали, что почва становится твердой и скручивается от стенок горшка? Да, она слишком сухая.)
Можно ли посадить суккулент на открытом воздухе в горшок без дренажа? Нет! Не делай этого, пожалуйста. Поскольку большая часть посадки суккулентов в горшки без дренажных отверстий заключается в контроле за их водопоглощением, размещение горшков без дренажа на открытом воздухе — плохая идея. (Если только он не находится в крытой зоне.) Вы не можете контролировать дождь, и сильный ливень может легко захлестнуть ваше растение, если воде некуда деться.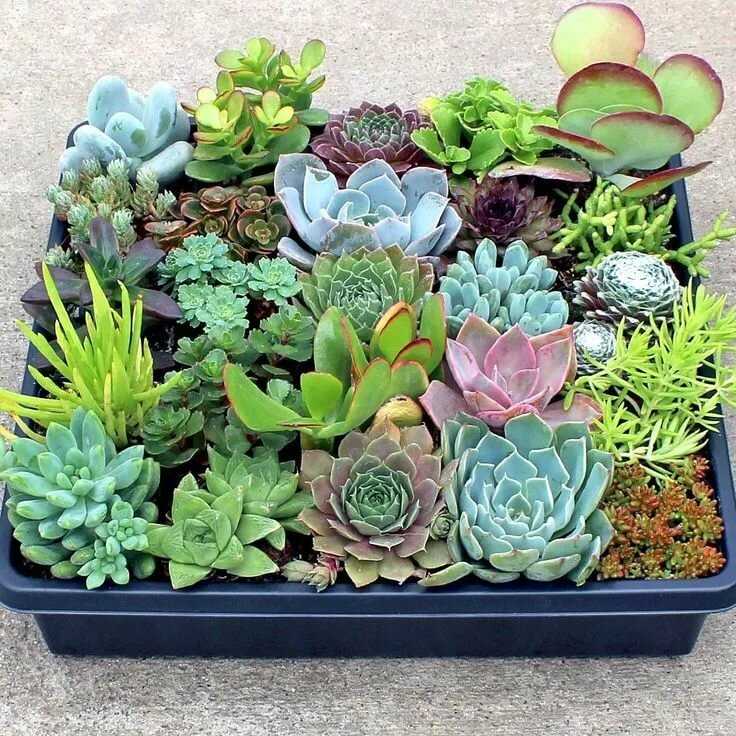
Ваша почва также, вероятно, будет быстрее высыхать на открытом воздухе в жару и на солнце. Для суккулентов на открытом воздухе я настоятельно рекомендую горшок с дренажем и хорошо дренируемой почвой. Поливайте часто, иногда ежедневно, если очень жарко и сухо. Излишки будут стекать, а почва сохранит остальное.
Поделитесь моими советами о том, как сажать суккуленты в горшки без дренажных отверстий, на Pinterest!Как сажать суккуленты – Leaf & Clay
Независимо от того, сажаете ли вы недавно приобретенные суккуленты из Leaf & Clay или пересаживаете некоторые из своей текущей коллекции, следуйте приведенным ниже инструкциям, чтобы вырастить и сохранить счастливые и здоровые суккуленты.
На что следует обратить внимание перед посадкой суккулентов
Первое и самое важное, на что следует обратить внимание перед посадкой суккулентов, — это тип почвы, в которую они будут высаживаться. Почва должна представлять собой хорошо дренируемую смесь органического материала, пемзы или перлита и песка. . Как правило, хорошая суккулентная почва должна содержать в равных частях органический материал (торфяной мох или кору) и неорганический материал (пемзу или перлит) с не более чем 10% песка.
Следующее, что следует учитывать, это контейнер, в который будут высаживаться суккуленты. Конечно, если ваши растения собираются в землю, эта информация неприменима. В идеале любой контейнер, в который вы решите посадить суккуленты, должен иметь дренажное отверстие, хотя это и не обязательно. Мы продаем различные горшки с дренажным отверстием и без него. Дренажное отверстие — это небольшое отверстие в дне горшка, которое позволяет лишней воде стекать из почвы и из горшка. Это отверстие также позволяет кислороду более свободно циркулировать в почве, сокращая время высыхания и улучшая здоровье корней.
Без дренажного отверстия почва будет оставаться влажной гораздо дольше, если вы случайно перельете ее, что увеличивает вероятность гниения и необратимого повреждения корневой системы вашего растения. Если вы сажаете в горшок без дренажного отверстия, вам просто нужно быть осторожным, чтобы не перелить. Когда дело доходит до суккулентов и их здоровья, избыток воды — враг общества №1.
Фото: внешний вид правильной почвенной смеси для суккулентов
Фото: горшок для суккулентов из листьев и глины с дренажным отверстием
Шаги по посадке суккулентов
У вас есть хорошо дренируемый горшок, подходящая суккулентная почва и растения с голыми корнями, готовые к работе. Приступим к посадке:
- Подготовьте вашу сеялку, заполнив ее на ¾ имеющейся в продаже предварительно смешанной почвой для суккулентов или вашей собственной смесью 50/50. Если вы пересаживаете суккулент в горшок большего размера, убедитесь, что горшок примерно на 2 дюйма шире диаметра суккулента. Это даст суккуленту достаточно места для роста и стабилизации.
- Вытащите суккулент из текущего горшка и осторожно ослабьте корни. Вы можете «пощекотать» корни снизу, чтобы разрыхлить их и сбить почву.
 Думайте об этом шаге, как о приятном растяжении корней. Распространение и удлинение позволит им стабилизироваться в большом горшке и привыкнуть к новой почве. Это идеальное время, чтобы смахнуть отмершие корни, а также удалить отмершие листья вокруг основания растения. При этом не забудьте смахнуть старую лишнюю грязь!
 - Выкопайте неглубокую яму в новой почве, поместите в нее суккулент, затем засыпьте корни большим количеством почвы для горшков, плотно утрамбовав, чтобы растение стабилизировалось. Обязательно добавьте достаточно почвы, чтобы достичь основания растения, но не накрывайте листья и не позволяйте листьям лежать поверх почвы! Это приведет к гниению листьев, потому что они будут поглощать слишком много влаги из почвы.
- Как только растение стабилизируется, вы можете придать своему новому суккуленту в горшке индивидуальность, добавив цветные камни, гальку или песок. Если вы добавляете что-то сверху, убедитесь, что материал хорошо дренируется, чтобы вода могла попасть в почву внизу!
**Обратите внимание: важно не поливать только что высаженные в горшки суккуленты в течение нескольких дней.